So I have my trusty guacamole recipe that you can find here, but I have never really posted about salsa. That’s mostly because Chris and I can’t really compromise when it comes to salsa. He likes it spicy and I like it mild. However, I do realize that I am in the minority which is why I didn’t mind trying out a new salsa recipe that involved some very hot and spicy peppers from the farmers market.
What you need:
3 cups tomatoes - chopped (about 3 large tomatoes)
1/2 cup green bell pepper - chopped (about 1/3 of a green bell pepper)
1 cup onion (I used yellow) - chopped (about 1/2 an onion)
1/4 cup fresh cilantro - minced
1 jalepeno pepper - chopped
1 chili pepper - chopped
1/2 tsp corse salt
1/2 tsp black pepper
Optional- 2 tbsp lime juice
Optional- Leave out a pepper to make it less spicy
What you do:
Prepare all ingredients- chop, mince, measure, etc.
Combine all ingredients in a bowl and mix completely.
Serve with chips!
Nothing like a little cooking, baking, crafting, and music to brighten a quaint Brooklyn apartment.
Friday, September 19, 2014
Thursday, September 18, 2014
A Picture is Worth a Thousand Words
I’ve been trying to paint more. On days that I do I feel really good and creative. I also love collaging, so I tried combining the two and I suggest you do too. If you want some other ideas check out my previous post on painting projects.
What you need:
Canvas
New Yorker (or other magazine/newspaper)
Mod-podge
Paintbrush
Black paint
Scissors
What you do:
Cut or tear news stories out of the magazine/newspaper.
Paint on the canvas with Mod-podge and cover with pieces of news paper.
Wait for it to dry then coat the newspaper with Mod-podge again.
Wait for that to dry.
Paint whatever you would like on there in black paint.
What you need:
Canvas
New Yorker (or other magazine/newspaper)
Mod-podge
Paintbrush
Black paint
Scissors
What you do:
Cut or tear news stories out of the magazine/newspaper.
Paint on the canvas with Mod-podge and cover with pieces of news paper.
Wait for it to dry then coat the newspaper with Mod-podge again.
Wait for that to dry.
Paint whatever you would like on there in black paint.
Monday, September 15, 2014
Let's do this! NY edition- Part 2
I don't usually post two in one day, BUT this event is only around for a limited time. As many of you know Chris and I have been trying to get out and explore the city and take advantage of the wonderful things it has to offer. If you have no idea what I am talking about you should read about our New York I Love You, But You're Bringing Me Down list (despite the negative name, the post/concept is actually quite positive), and if you missed my first post on Smorgasburg and the Brooklyn Brewery be sure to check it out.
Now, on to the REAL reason I am posting twice in one day. On Friday night Chris and I met up with our friend on the lower west side and walked over to Little Italy. Both of us have been to Little Italy before, so we wanted a bit more of a unique experience and that is definitely what we got with the Feast of San Genero festival. Walking up to Little Italy on Mulberry street you are instantly greeted with bright lights all over the street, lots of people, amazing smells, and food/fun EVERYWHERE. We walked about 5-6 blocks of the festival although it kept going and spreading out everywhere. We attempted to visit the restaurant Parm that was highly recommended, but it was too busy, so we got an appetizer of fried mozzarella in corn bread which honestly doesn't sound like it would be that good until you bite into it and it is the perfect combination of sweet and cheesy. If you go, I highly recommend it. It is one of the more common things to find there. We ate at Italian Food Center which seems like a bit of a cop out because it's a restaurant not one of the vendors, BUT they had set up an amazing outdoor section right on the street so you were really part of the crowd, but set aside enough that you could still enjoy your meal while seeing the festival evolve. After dinner we made our way back through the crowd collecting various desserts (fried oreos, macaroons and cannolis) to take home because we were just too stuffed to try and eat them there. All in all it was a lot of fun and I highly recommend it. Even if you don't make the festival Little Italy is a fantastic place to walk around. Lots of cute restaurants and shops.
Good: As inexpensive as you want, lots of choices for everyone, carnival games/rides, delicious food.
Bad: Crowded, lots of lines, they sell out of things on the early side.
Now, on to the REAL reason I am posting twice in one day. On Friday night Chris and I met up with our friend on the lower west side and walked over to Little Italy. Both of us have been to Little Italy before, so we wanted a bit more of a unique experience and that is definitely what we got with the Feast of San Genero festival. Walking up to Little Italy on Mulberry street you are instantly greeted with bright lights all over the street, lots of people, amazing smells, and food/fun EVERYWHERE. We walked about 5-6 blocks of the festival although it kept going and spreading out everywhere. We attempted to visit the restaurant Parm that was highly recommended, but it was too busy, so we got an appetizer of fried mozzarella in corn bread which honestly doesn't sound like it would be that good until you bite into it and it is the perfect combination of sweet and cheesy. If you go, I highly recommend it. It is one of the more common things to find there. We ate at Italian Food Center which seems like a bit of a cop out because it's a restaurant not one of the vendors, BUT they had set up an amazing outdoor section right on the street so you were really part of the crowd, but set aside enough that you could still enjoy your meal while seeing the festival evolve. After dinner we made our way back through the crowd collecting various desserts (fried oreos, macaroons and cannolis) to take home because we were just too stuffed to try and eat them there. All in all it was a lot of fun and I highly recommend it. Even if you don't make the festival Little Italy is a fantastic place to walk around. Lots of cute restaurants and shops.
Good: As inexpensive as you want, lots of choices for everyone, carnival games/rides, delicious food.
Bad: Crowded, lots of lines, they sell out of things on the early side.
Summer of love and tie-dye
I know it's more fall than summer right now, but I thought I would squeeze in one more summer craft before the cold weather sinks in. I love tie-dye. It’s a lot of fun, but super messy. Basically you need a big outdoor area in order to actually dye things without making a mess and in NYC you can probably guess that a large outdoor area where they don’t care that you are dying clothing is sort of hard to come by. You can go to the park, but you have to bring all of the stuff (including A LOT of water for the dye and yourself). So when I came across an easy way to do tie-dye I had to try it.
What you need:
Sharpies (of many colors)
Rubbing alcohol
Solo/disposable cup
Rubber band
Newspaper
Something to tie-dye (I used an old green teeshirt)
Magazine (optional)
What you do:
So originally the instructions told me to put a small section of the shirt over the cup and put a rubber band over it so you can draw on it with sharpies.
I used a magazine and drew bigger things, but be careful this stuff can stain (obviously).
Fix your shirt on the cup or over a magazine.
Draw with different colored sharpies all over the shirt. I drew flowers and spirals and pinwheel designs.
When that section of shirt has been drawn on use the cap from the rubbing alcohol to dribble rubbing alcohol over the sharpie.
Spread using your fingers (optional).
Continue until the whole shirt is covered.
Let dry over a towel rack or shower curtain rod.
Rock your tie-dye!
*Helpful hit:
Draw patterns or things like flowers.
When you are spreading the ink only spread with the lines. I went all over the place.
What you need:
Sharpies (of many colors)
Rubbing alcohol
Solo/disposable cup
Rubber band
Newspaper
Something to tie-dye (I used an old green teeshirt)
Magazine (optional)
What you do:
So originally the instructions told me to put a small section of the shirt over the cup and put a rubber band over it so you can draw on it with sharpies.
I used a magazine and drew bigger things, but be careful this stuff can stain (obviously).
Fix your shirt on the cup or over a magazine.
Draw with different colored sharpies all over the shirt. I drew flowers and spirals and pinwheel designs.
When that section of shirt has been drawn on use the cap from the rubbing alcohol to dribble rubbing alcohol over the sharpie.
Spread using your fingers (optional).
Continue until the whole shirt is covered.
Let dry over a towel rack or shower curtain rod.
Rock your tie-dye!
*Helpful hit:
Draw patterns or things like flowers.
When you are spreading the ink only spread with the lines. I went all over the place.
Thursday, September 11, 2014
Sealed with a kiss!
I LOVE getting mail. There is something so fun about going to your mailbox and seeing something that isn’t a bill, but is actually a card or letter from an actual person not some company charging way too much money for electricity. It may sound crazy, but I still buy stationary, I still send Christmas cards because it makes people feel special. Never underestimate the power of a card. Not everyone wants to buy stationary or likes the way it looks or can afford it, but that doesn’t mean you can’t send a really nice card to someone.
I did a Valentines day card post a while back, but these are more birthday oriented (and one bridal shower).
Card 1: Bridal shower
This card would be adorable to give to someone getting married for their bridal shower or as a just because card.
What you need:
Doily
Scrapbook paper (for backing)
Glue
Scissors
Washi tape or ribbon (optional)
What you do:
Cut the size of the card that you want.
Cut a dress shape out of the doily. If you are nervous about that part you should draw it on and cut just inside where you drew the lines.
Glue doily to scrapbook paper backing.
Add wash tape or ribbon bow.
Card 2: Birthday cake
This is a cute quick card that shows the decadence everyone deserves on their birthday.
What you need:
Scrapbook paper
Washi tape
Scissors
What you do:
Cut out card.
Fold in half.
Start from the bottom.
Cut a medium sized oval out of washi tape and put at the bottom of your card.
Next cut a triangular column of washi tape.
Then cut a small oval and tape it down.
Then cut a semi circle out of tape and put it on curved side down flat side on top.
Cut a longer oval and put it on top.
Now for the cake, make layers out of washi tape.
Create a candle on top.
Write happy birthday inside the card!
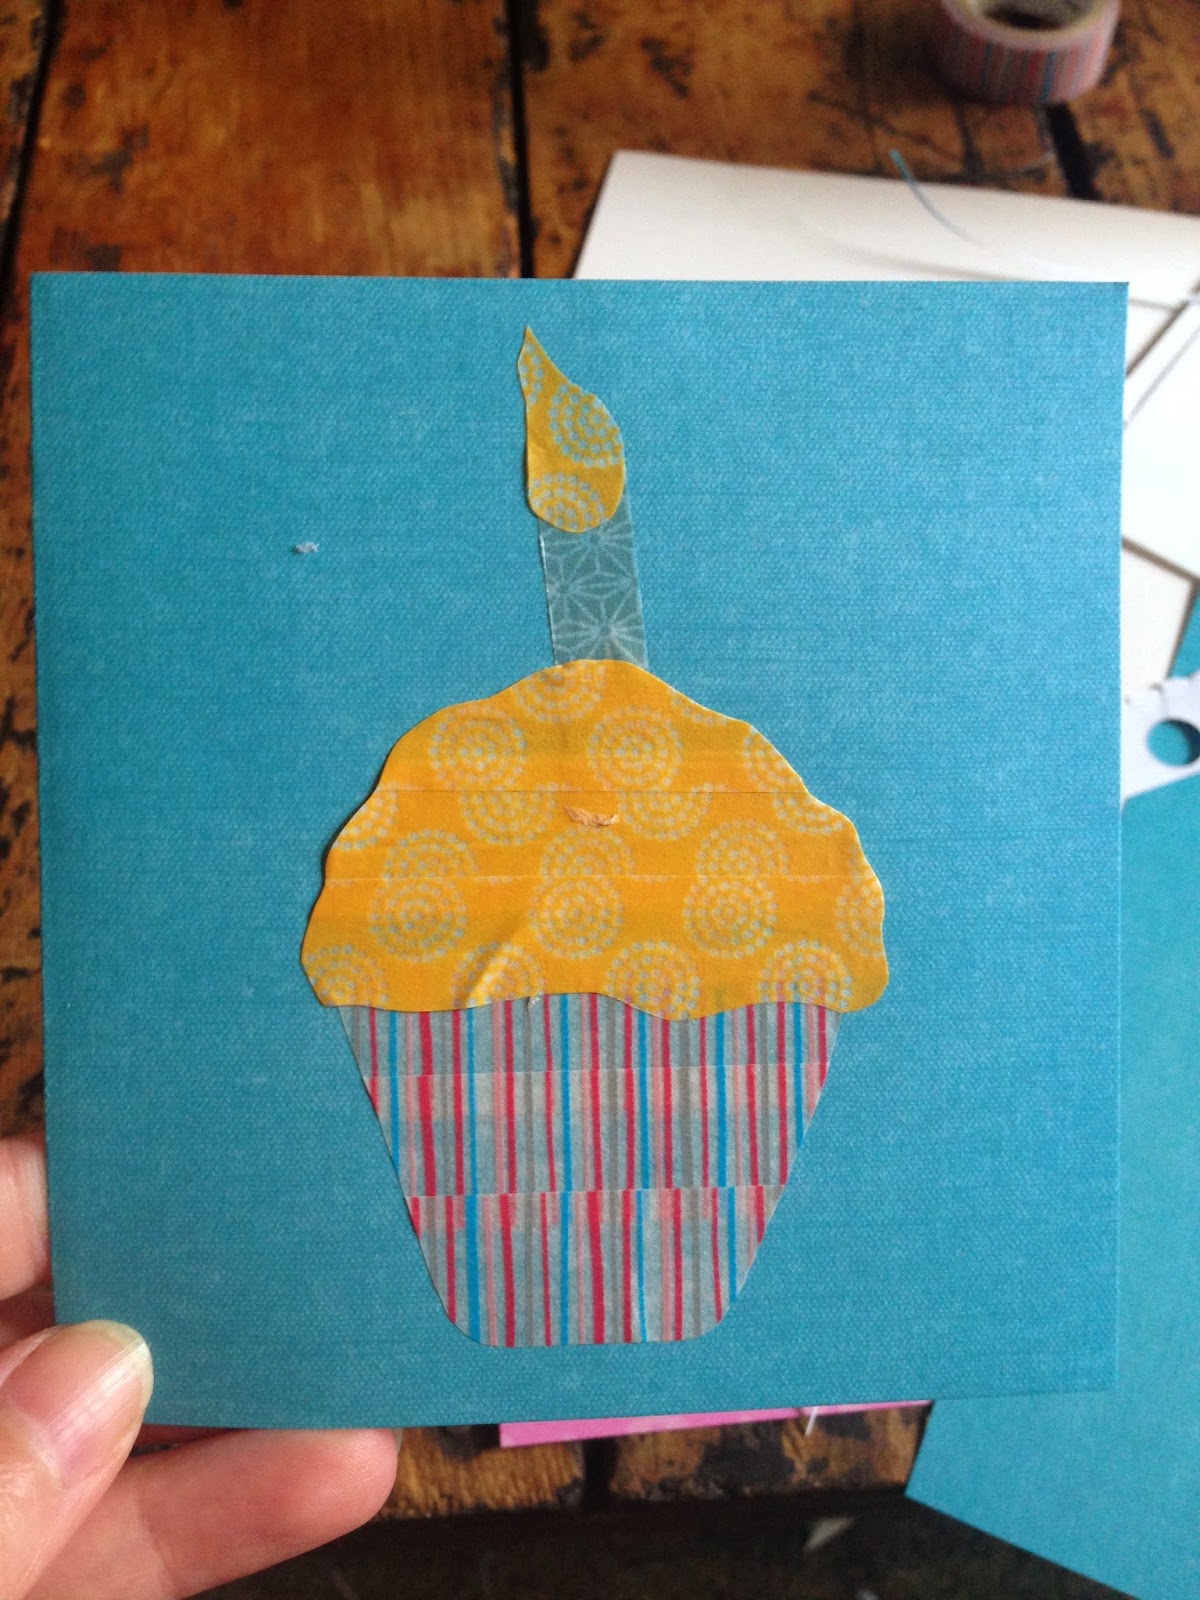
Card 3: Birthday cupcake
For those people that are still into the cupcake trend.
What you need:
Scrapbook paper
Washi tape
Scissors
What you do:
Cut out card.
Fold in half.
Layer several pieces of washi tape and cut them to make a cupcake liner.
Repeat layering several pieces of washi tape.
Cut the outline of a frosting dome using wavy lines.
Use wash tape to make a lit candle.
Card 4: Make a wish birthday candles
Honestly? This one is mostly for when you are in a rush because it is super simple while still being cute.
What you need:
Scrapbook paper
Washi tape
Scissors
Sharpie
What you do:
Cut out card.
Fold in half.
Cut different length and width strips of washi tape.
Put them down on the card.
Make wicks out of sharpie.
Make flames from washi tape and put on top of the candles.
Write “make a wish” inside the card.
Bonus: envelope
Use scrapbook paper or regular paper to make an envelope for your lovely cards.
What you need:
Paper
Scissors
Glue
What you do:
Figure out the size of your envelope by putting your card down in the center.
Fold the paper over the sides of the card so that they overlap and crease the edges.
Do the same for the top and bottom.
Make sure you aren’t bending the card…if it helps you can unfold the original creases so you can see the card again.
Unfold everything you should see a boxes or rectangles in each of the corners.
Cut those out so that none of the original 4 corners are there.
Round all of the other corners.
Fold and glue the sides together (the ones that are bigger).
Fold the bottom over the glued together sides and glue that.
Leave the top open and close it with washi tape or something easy to open.
I did a Valentines day card post a while back, but these are more birthday oriented (and one bridal shower).
Card 1: Bridal shower
This card would be adorable to give to someone getting married for their bridal shower or as a just because card.
What you need:
Doily
Scrapbook paper (for backing)
Glue
Scissors
Washi tape or ribbon (optional)
What you do:
Cut the size of the card that you want.
Cut a dress shape out of the doily. If you are nervous about that part you should draw it on and cut just inside where you drew the lines.
Glue doily to scrapbook paper backing.
Add wash tape or ribbon bow.
Card 2: Birthday cake
This is a cute quick card that shows the decadence everyone deserves on their birthday.
What you need:
Scrapbook paper
Washi tape
Scissors
What you do:
Cut out card.
Fold in half.
Start from the bottom.
Cut a medium sized oval out of washi tape and put at the bottom of your card.
Next cut a triangular column of washi tape.
Then cut a small oval and tape it down.
Then cut a semi circle out of tape and put it on curved side down flat side on top.
Cut a longer oval and put it on top.
Now for the cake, make layers out of washi tape.
Create a candle on top.
Write happy birthday inside the card!
Card 3: Birthday cupcake
For those people that are still into the cupcake trend.
What you need:
Scrapbook paper
Washi tape
Scissors
What you do:
Cut out card.
Fold in half.
Layer several pieces of washi tape and cut them to make a cupcake liner.
Repeat layering several pieces of washi tape.
Cut the outline of a frosting dome using wavy lines.
Use wash tape to make a lit candle.
Card 4: Make a wish birthday candles
Honestly? This one is mostly for when you are in a rush because it is super simple while still being cute.
What you need:
Scrapbook paper
Washi tape
Scissors
Sharpie
What you do:
Cut out card.
Fold in half.
Cut different length and width strips of washi tape.
Put them down on the card.
Make wicks out of sharpie.
Make flames from washi tape and put on top of the candles.
Write “make a wish” inside the card.
Bonus: envelope
Use scrapbook paper or regular paper to make an envelope for your lovely cards.
What you need:
Paper
Scissors
Glue
What you do:
Figure out the size of your envelope by putting your card down in the center.
Fold the paper over the sides of the card so that they overlap and crease the edges.
Do the same for the top and bottom.
Make sure you aren’t bending the card…if it helps you can unfold the original creases so you can see the card again.
Unfold everything you should see a boxes or rectangles in each of the corners.
Cut those out so that none of the original 4 corners are there.
Round all of the other corners.
Fold and glue the sides together (the ones that are bigger).
Fold the bottom over the glued together sides and glue that.
Leave the top open and close it with washi tape or something easy to open.
Wednesday, September 10, 2014
Chicken noodle soup without the noodles...or the soup
I love chicken noodle soup, but in the summer it can be really hard to stomach something so hot or to stand over the soup pot in these hot summer months. This recipe for chicken on a bed of vegetables is great for that chicken soup craving without all the hard work. And to sweeten to deal it’s a one dish recipe so not a whole lot of clean up.
Serves 2 (and you will have left overs)
What you need:
2 bone in, skin on chicken breast
2 carrots
2 celery stocks
2-3 red potatoes
1/2 onion (I used red, but next time I am going to try a yellow onion)
Poultry or every day seasoning (I used Trader Joe’s every day seasoning, garlic salt, and lemon pepper)
1 tbsp butter
Olive oil
A little bacon grease (optional)
What you do:
Preheat oven to 450 degrees.
Wash all the veggies.
Use a peeler or knife to peel the carrots.
Chop them into 1/4 inch pieces.
Chop celery into 1/4 inch pieces.
Peel and cut potatoes in half then in half again. Then cut those halves into 1/4 inch pieces.
Chop 1/2 onion.
Put all the chopped veggies into an oven safe pan.
Coat in olive oil.
Add a little bacon grease.
Mix and put in the oven for about 10-15 minutes until the veggies start to brown. Stir about half way through.
While veggies are cooking rub the two chicken breasts with a little olive oil and cover liberally with seasoning.
When veggies are starting to brown, remove from oven and place seasoned chicken on top of the veggies.
Put 1/2 tbsp butter on top of each chicken breast and put in the oven for about 25 mins (until juices run clear, or internal temp is 165 degrees).
Remove from oven, serve, and enjoy!
Serves 2 (and you will have left overs)
What you need:
2 bone in, skin on chicken breast
2 carrots
2 celery stocks
2-3 red potatoes
1/2 onion (I used red, but next time I am going to try a yellow onion)
Poultry or every day seasoning (I used Trader Joe’s every day seasoning, garlic salt, and lemon pepper)
1 tbsp butter
Olive oil
A little bacon grease (optional)
What you do:
Preheat oven to 450 degrees.
Wash all the veggies.
Use a peeler or knife to peel the carrots.
Chop them into 1/4 inch pieces.
Chop celery into 1/4 inch pieces.
Peel and cut potatoes in half then in half again. Then cut those halves into 1/4 inch pieces.
Chop 1/2 onion.
Put all the chopped veggies into an oven safe pan.
Coat in olive oil.
Add a little bacon grease.
Mix and put in the oven for about 10-15 minutes until the veggies start to brown. Stir about half way through.
While veggies are cooking rub the two chicken breasts with a little olive oil and cover liberally with seasoning.
When veggies are starting to brown, remove from oven and place seasoned chicken on top of the veggies.
Put 1/2 tbsp butter on top of each chicken breast and put in the oven for about 25 mins (until juices run clear, or internal temp is 165 degrees).
Remove from oven, serve, and enjoy!
Net Neutrality
Stepping away from my traditional role I am putting on my activism hat and telling you to seriously pay attention to the issue of net neutrality. Large companies want to make usable internet impossible. Want to constantly look at a loading button? Sorry, but forget Netflix, forget little otters making baskets, forget kittens and fainting goats. We live in a technology age. Technology has become our friend and you can't turn your back on a friend, so I'm asking you for one day to take the time to change your profile picture (find images here) or share one of the photos (find them here) to raise awareness. If that kind of thing isn't your jam then enter your e-mail address (at this link) to show your support. Above all, even if you don't do any of those things please at least be informed and look at the information. Thanks!
FOR MORE INFO AND PROFILE PICS AND PICS TO SHARE:
go here
Here is a message from Fight for the Future:
If you woke up tomorrow, and your internet looked like this, what would you do?
Imagine all your favorite websites taking forever to load, while you get annoying notifications from your ISP suggesting you switch to one of their approved “Fast Lane” sites.
Think about what we would lose: all the weird, alternative, interesting, and enlightening stuff that makes the Internet so much cooler than mainstream Cable TV. What if the only news sites you could reliably connect to were the ones that had deals with companies like Comcast and Verizon?
On September 10th, just a few days before the FCC’s comment deadline, public interest organizations are issuing an open, international call for websites and internet users to unite for an “Internet Slowdown” to show the world what the web would be like if Team Cable gets their way and trashes net neutrality. Net neutrality is hard to explain, so our hope is that this action will help SHOW the world what’s really at stake if we lose the open Internet.
If you’ve got a website, blog or tumblr, get the code to join the #InternetSlowdown here: https://battleforthenet.com/sept10th
Everyone else, here’s a quick list of things you can do to help spread the word about the slowdown: http://tumblr.fightforthefuture.org/post/96020972118/be-a-part-of-the-great-internet-slowdown
Get creative! Don’t let us tell you what to do. See you on the net September 10th!
FOR MORE INFO AND PROFILE PICS AND PICS TO SHARE:
go here
Here is a message from Fight for the Future:
If you woke up tomorrow, and your internet looked like this, what would you do?
Imagine all your favorite websites taking forever to load, while you get annoying notifications from your ISP suggesting you switch to one of their approved “Fast Lane” sites.
Think about what we would lose: all the weird, alternative, interesting, and enlightening stuff that makes the Internet so much cooler than mainstream Cable TV. What if the only news sites you could reliably connect to were the ones that had deals with companies like Comcast and Verizon?
On September 10th, just a few days before the FCC’s comment deadline, public interest organizations are issuing an open, international call for websites and internet users to unite for an “Internet Slowdown” to show the world what the web would be like if Team Cable gets their way and trashes net neutrality. Net neutrality is hard to explain, so our hope is that this action will help SHOW the world what’s really at stake if we lose the open Internet.
If you’ve got a website, blog or tumblr, get the code to join the #InternetSlowdown here: https://battleforthenet.com/sept10th
Everyone else, here’s a quick list of things you can do to help spread the word about the slowdown: http://tumblr.fightforthefuture.org/post/96020972118/be-a-part-of-the-great-internet-slowdown
Get creative! Don’t let us tell you what to do. See you on the net September 10th!
Subscribe to:
Posts (Atom)